Recently I have been working more with network automation and using Arista Validated Designs (AVD), Ansible and Netbox. A somewhat common request that I encounter is being able to pull the Ansible inventory from Netbox. There is an Ansible plugin for this called “nb_inventory” to do this exact function. However, through my testing I have found a more preferable approach. I opt for executing an Ansible playbook with a GraphQL query, which then processes the output through a Jinja template to create the inventory file. This technique offers a significant advantage: in the event of a Netbox server outage or accessibility issues, the inventory remains usable for running Ansible playbooks until access to Netbox is restored. In the upcoming example, I’ll introduce additional logic tailored for environments using AVD. However, the approach can be easily adapted for scenarios involving only Ansible and Netbox. This article presumes the presence of functional Netbox and AVD environments which is out of scope for this post.
Netbox API Token Key Creation
In order for Ansible to query Netbox we will need to set up an API key within Netbox. (if you do not have one already)
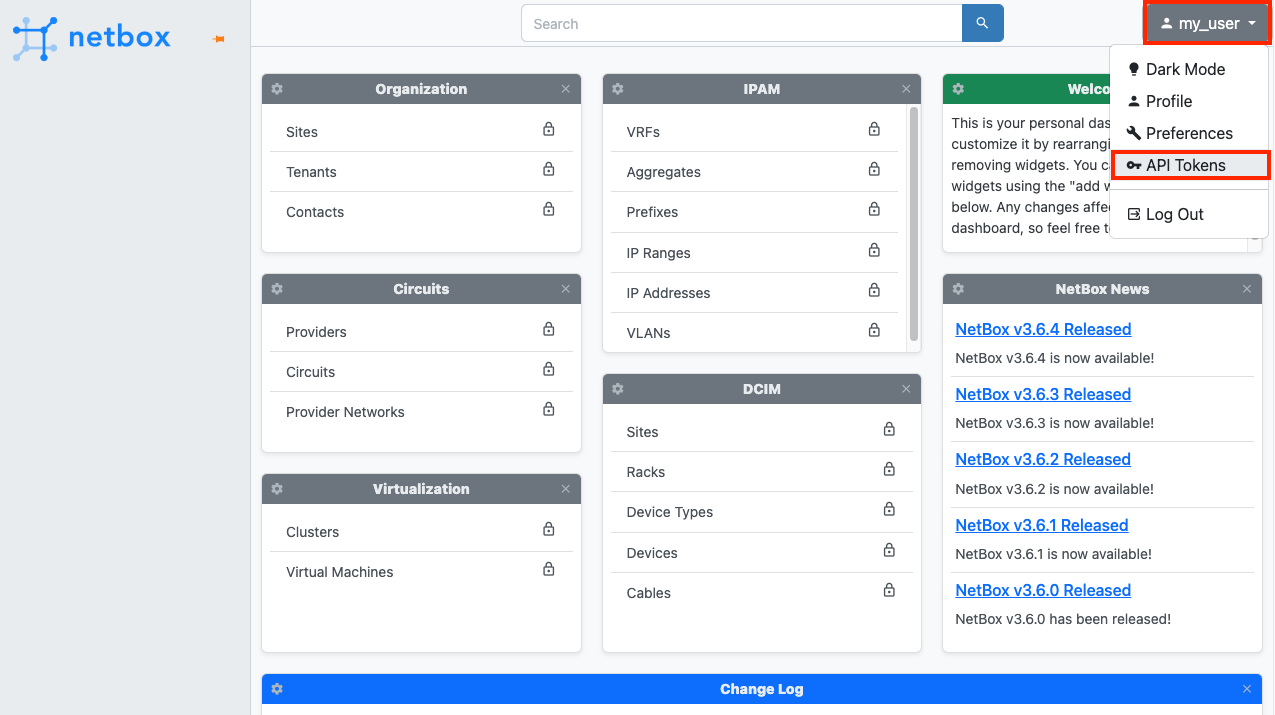
- Click on your user account in the upper right hand corner
- Click on API Tokens
-
Click “Add a Token”

- Add info if desired, once completed click “create” (you can leave all fields blank or fill them in, that's up to you)
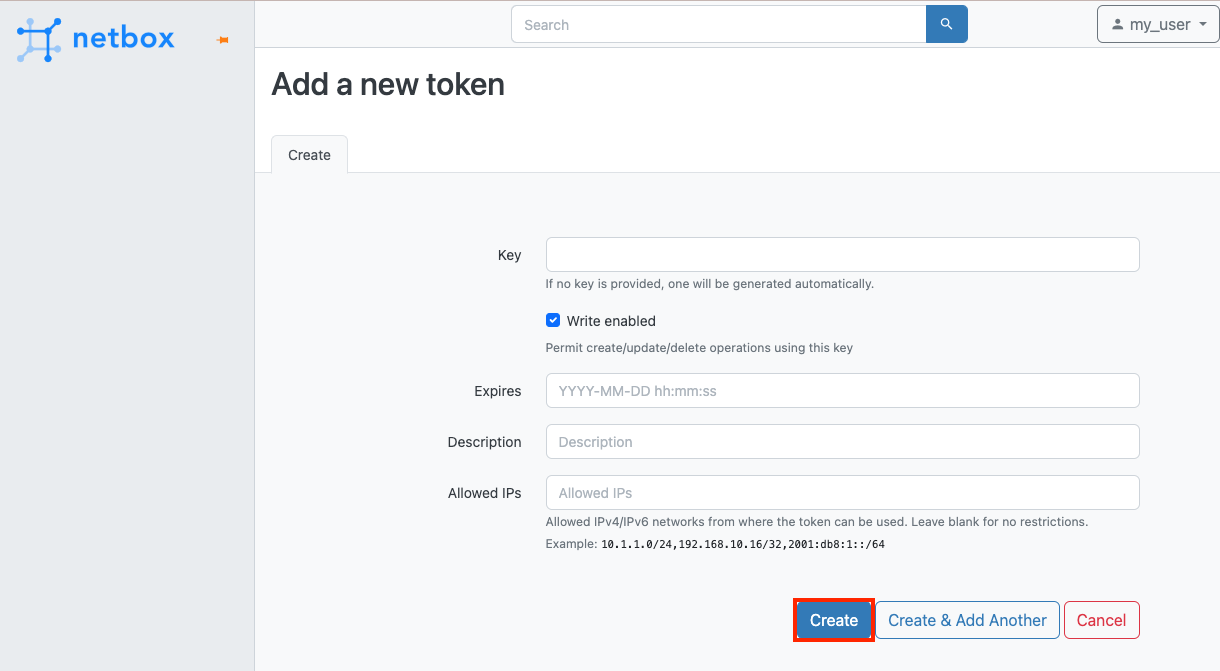
- Make note of your key, this will be used later on so that Ansible can connect to Netbox. For obvious reasons, not going to display my key here, be sure to keep your key safe.
In this example we will be using an Ansible playbook to build the inventory file which we will name “graphql_inventory.yml”. Starting with the playbook “inventory_builder.yml” let’s take a look at the configuration logic.

In a typical production scenario the variables can be pulled from a global location but for the purposes of this demo they are all located within the playbook inventory_builder.yml.
site_name: For this example we are using the location name Toledo. This name could be anything you would like to refer to your location as.
nb_token: In order to run GraphQL queries against Netbox you will need to set up an API token.
nb_graphql_url: This is the GraphQL interface URL. Typically it can be found by adding “/graphql/” to the web server interface that you use to access Netbox. I use http://127.0.0.1:8000/graphql/ since my Netbox instance is running on a Docker container on port 8000.
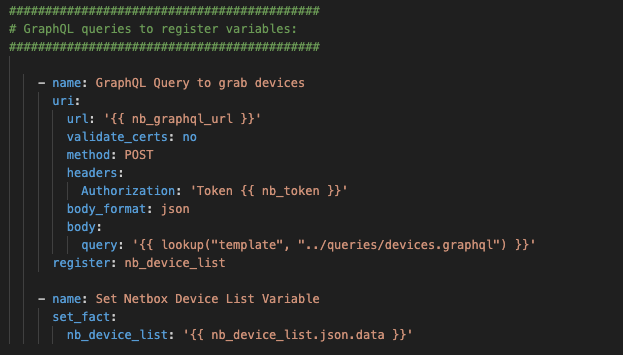
Output from the query devices.graphql is taken and registered as the variable “nb_device_list”.
GraphQL Query
The next part of the playbook is the GraphQL query which is responsible for pulling information out of Netbox. This query gathers all the devices for the Toledo site along with their primary_IPv4 address and status.
Here is the actual code for the query that we are using:
{
device_list(site: "tol") {
name
status
primary_ip4 {
address
}
}
}
The query is filtered to the Toledo site by using (site: "tol"). If you have multiple sites you would need to update the filter for the site.
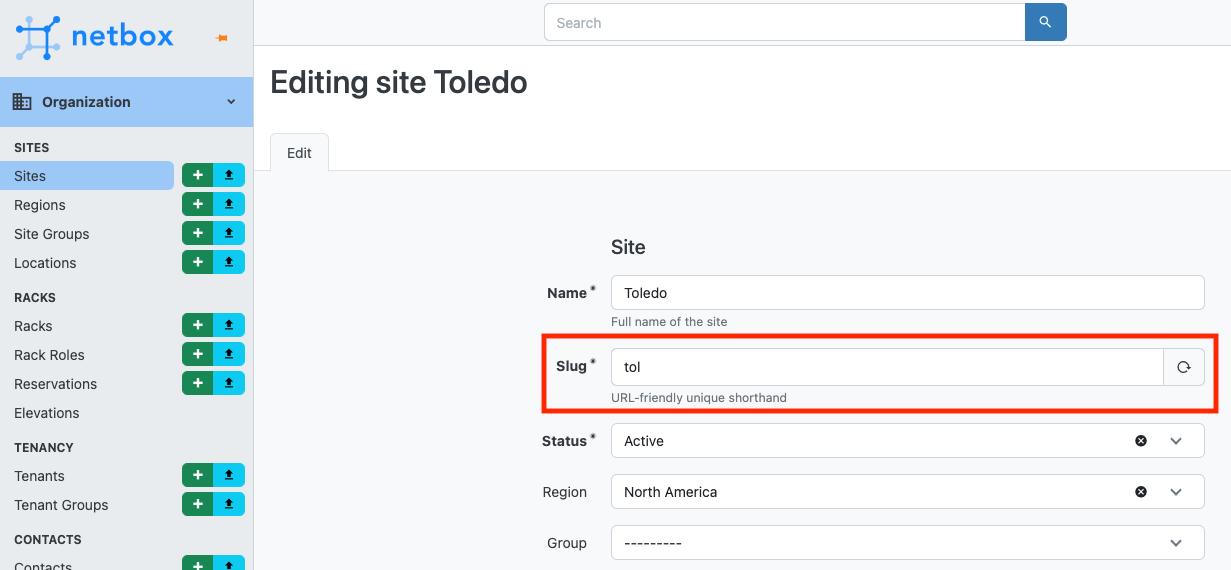
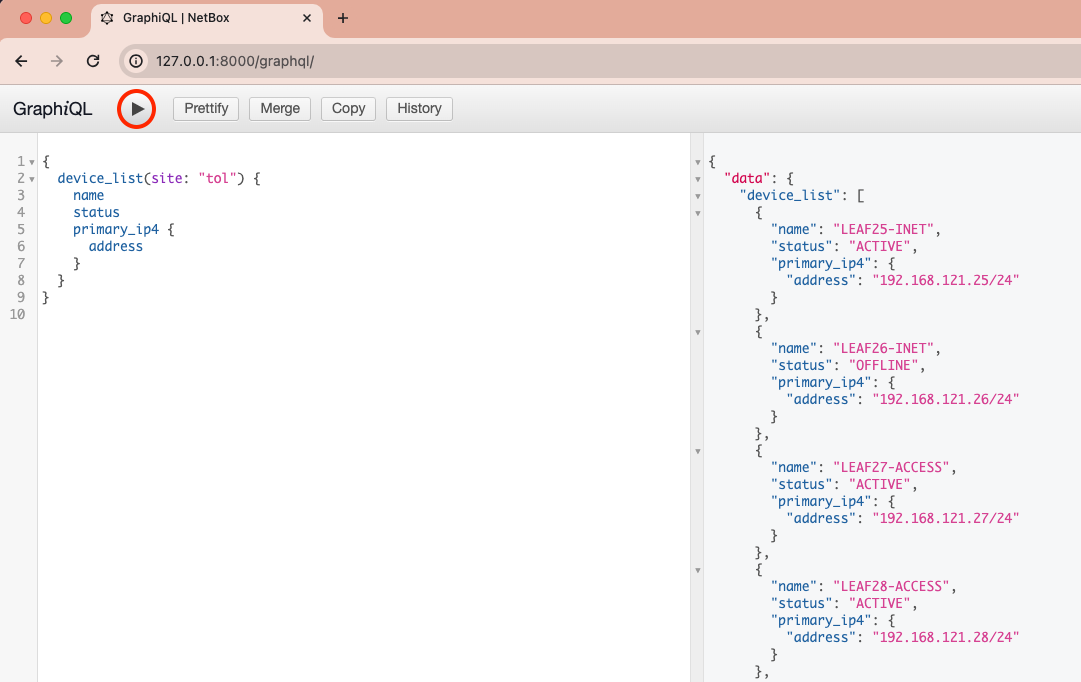
This query will grab the name, status and primary_ip4 address of each device at the Toledo site.
You can test and validate your query by going to http://127.0.0.1:8000/graphql (update your server IP and port number of your Netbox server) and adding in the query then clicking the “run” button.
After the variables are set we use a Jinja template called “inventory.j2” to create the output for our Inventory file.

Jinja Logic
Let’s explore what is happening in Jinja.
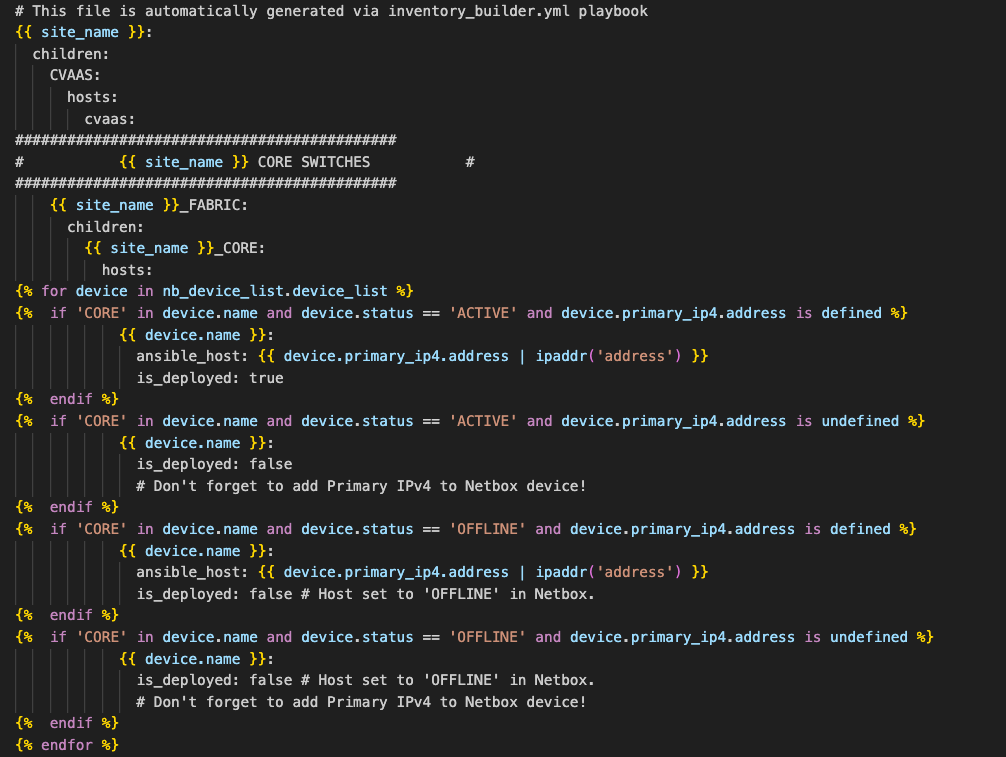
site_name is a variable for our location that we created in the inventory_builder.yml playbook from earlier. The first part to note is how we identify the core switch by the device name having “CORE” in the Name field.

From there we print the device’s primary_ip4 address and add some extra logic to remove the subnet mask using a Jinja ipaddr filter.
Additional logic has been added to cover various scenarios in AVD such as whether the switch is active or not. For example if later on you are using this inventory file and the eos_config_deploy_cvp role to deploy configlets to Cloudvision but the device is not in Cloudvision yet then “is_deployed” will need to be set to false. Otherwise running the playbook will fail. Additional logic helps us handle these scenarios so that the playbook will execute successfully.
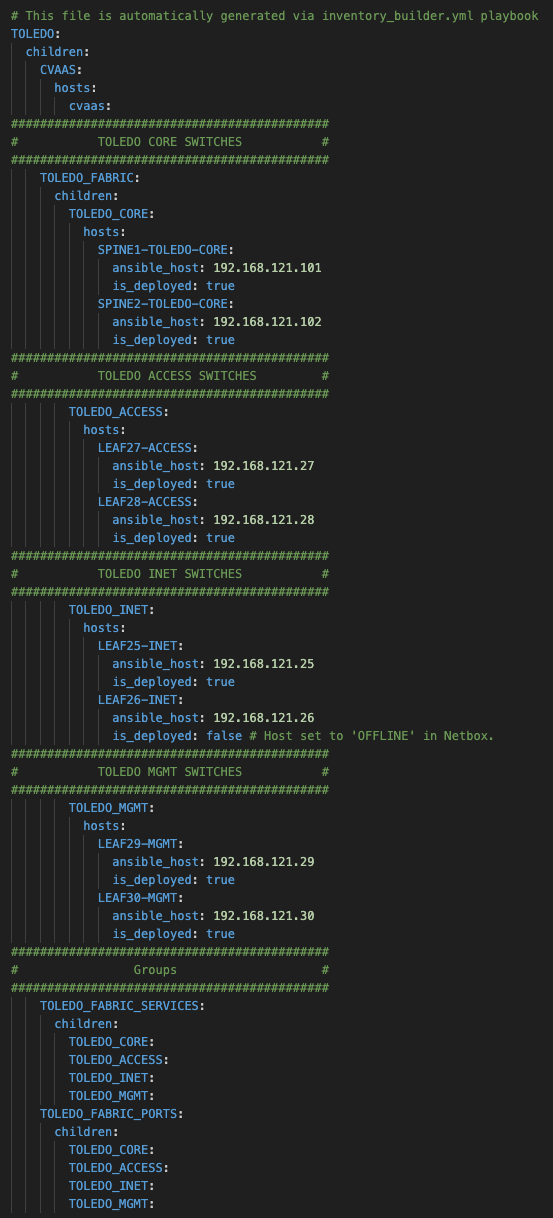
If a device exists with “CORE” in the hostname, has a primary_ip4 address and has a status of “ACTIVE” then this is what we want. Print the device name, IP address and set “is_deployed” to true.
If a device exists with “CORE” in the hostname, but does not have a primary_ip4 address assigned and has a status of active then print the device name and change “is_deployed” to false and add a message about not forgetting to assign an IP.
If a device exists with “CORE” in the hostname, has a primary_ip4 address but has a status of “OFFLINE” then change “is_deployed” to false then print the device name, primary_ipv4 address and set “is_deployed” to false and add message that the host is set to “OFFLINE” in Netbox.
If a device exists with “CORE” in the hostname, does not have a primary_ip4 address and has a status of “OFFLINE”. Then print the device name, set “is_deployed” to false and add a message about not forgetting to assign an IP.
Just like the core switches the same Jinja logic will be used for the groups ACCESS, INET and MGMT.
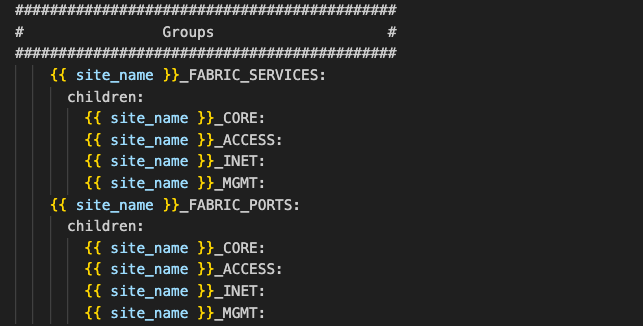
At the bottom in the inventory.j2 file we build the groups that will be used in AVD. Once again site_name is a variable that was created in the inventory_builder.yml playbook but can be called from elsewhere if desired.
Let’s go ahead and run the playbook with ansible-playbook playbooks/inventory_builder.yml

Note about running playbook for the first time
If you are running the playbook for the first time the graphql_inventory.yml file will not exist. In our ansible.cfg file we have graphql_inventory.yml set as the inventory file. The first time we run the playbook you will see the warnings shown below because the file does not exist. The playbook will still run and complete, now that the inventory file exists you should no longer see the warning messages. Everytime you run the playbook it will update the graphql_inventory.yml file.

After running the playbook you should now have a file named graphql_inventory.yml
Conclusion
The integration of AVD, Ansible, and Netbox for network automation presents an efficient approach to managing network inventories. Whether you're managing a small network in Toledo or a complex multi-site environment, the practices discussed here can be tailored to fit your specific needs. By embracing these techniques, network administrators can ensure more efficient, reliable, and scalable network operations. The key to successful automation lies in understanding the tools at your disposal and integrating them to solve real-world problems.
If you wish to check out the code I used in this blog post you can find it here: https://bitbucket.org/kgiusti1/pulling-avd-inventory-from-netbox-demo/src/master/
Need Help With This?
We can help. As an Arista Certified Services Partner (ACSP) and Arista Elite Partner, WAN Dynamics has the experience and resources to help clients build their own bespoke automation environment. Every network is a little different so we help integrate all of the components in a rational way following best current practices. To contact us, click on the button on the upper right hand corner of our page.
For more Arista related content, see some of our other blog posts here:
Arista Validated Designs: Transforming the Role of Network Engineers
WAN Dynamics Works With Arista for WAN Routing System
Remote Packet Capture over SSH on Arista EOS
Arista Tips & Tricks: Connecting to Arista switches via SSH Key Based Authentication
Three Features in Arista EOS That You Need to Know About
WAN Dynamics is One of Five Arista Certified Services Partners in the World

